
How to Fix Print Artifacts (Strings, Zits, and Blobs) in Creality Slicer?
3D printing can be both exciting and frustrating, especially when your prints are marred by unwanted artifacts like strings, zits, and blobs. These issues not only spoil the look of your prints but also often point to underlying problems with slicer settings, hardware, or filament choice. In this detailed guide, we’ll walk through the causes…
3D printing can be both exciting and frustrating, especially when your prints are marred by unwanted artifacts like strings, zits, and blobs. These issues not only spoil the look of your prints but also often point to underlying problems with slicer settings, hardware, or filament choice.
In this detailed guide, we’ll walk through the causes of these artifacts and provide practical, tested solutions to help you Fix Strings, Zits & Blobs in Creality Slicer (also called Creality Print), the slicer commonly used for Creality printers like the Ender 3 and CR-10 series. For more helpful 3D printing optimization tips, guides, and slicer settings tutorials, visit at thecrealityslicer.com.
What Are Print Artifacts?
Before we dive into fixing the problem, let’s first understand what these artifacts are and why they appear.
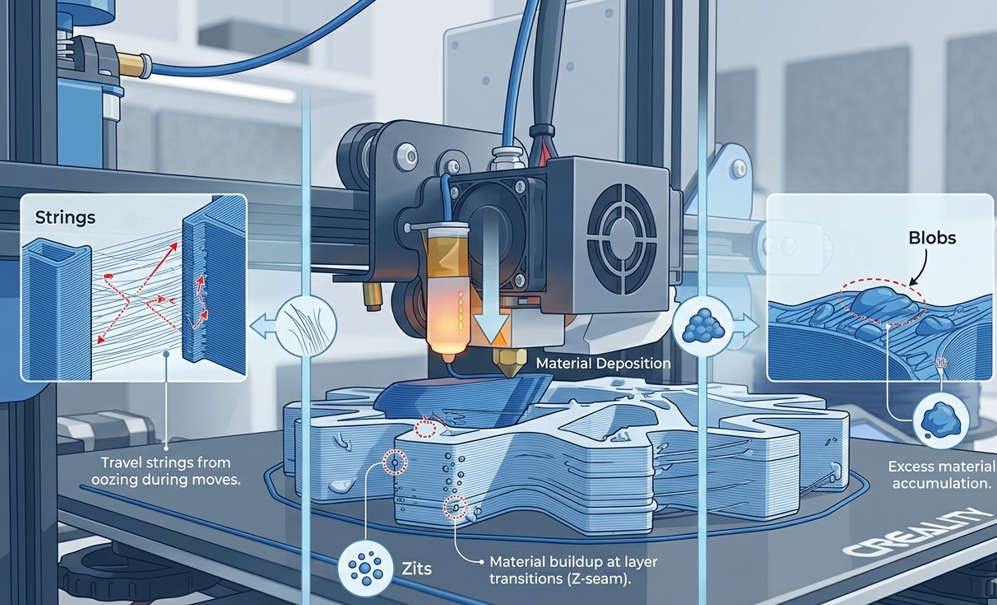
Strings
Stringing occurs when thin threads of filament are left behind on your print during travel moves. This usually happens when the extruder continues to ooze filament while moving from one section of the print to another, leaving behind a trail of stringy material.
It is most common with filaments like PLA, PETG, and TPU. These strings can be easily removed in post-processing, but it’s always better to solve the issue at its root.
Zits
Zits are small, raised bumps that appear on the surface of a print. These often show up where the nozzle starts or stops extruding, at the Z-seam. Zits can cause a rough finish and make your print look less polished, especially on flat surfaces. They are usually related to problems like over-extrusion, inconsistent retraction, or improper Z-seam settings.
Blobs
Blobs are larger, unsightly bulges of filament that form during a print. These are often caused by excess filament being extruded at incorrect times, such as during travel moves, retraction failure, or rapid extrusion settings. While they might not drastically affect the strength of a print, they are aesthetically undesirable and can cause dimensional inaccuracies.
Why Do These Artifacts Appear?
Understanding the causes behind print artifacts is key to fixing them. The issues stem from a combination of slicer settings, filament properties, and hardware conditions.
Retraction Settings
The most common cause of stringing, zits, and blobs is improper retraction. Retraction refers to the process of pulling the filament back into the nozzle during travel moves to prevent oozing.
- Short retraction distance: If the retraction distance is too short, the filament doesn’t retract enough to stop oozing.
- Slow retraction speed: If the extruder is retracting too slowly, the nozzle continues to ooze filament while it’s moving between print sections.
- No retraction during travel moves: Without retraction on travel moves, filament will flow out while the nozzle is moving to another area, leaving behind strings.
Excess Nozzle Pressure
When the nozzle stops extruding and begins moving to a new part of the print, there is still pressure inside the hot end. If the pressure isn’t relieved correctly, the filament continues to ooze out during travel, leading to zits and blobs.
This pressure is influenced by temperature, print speed, and extrusion settings. If the extruder temperature is too high, the filament will remain too liquid and prone to oozing.
Over‑Extrusion
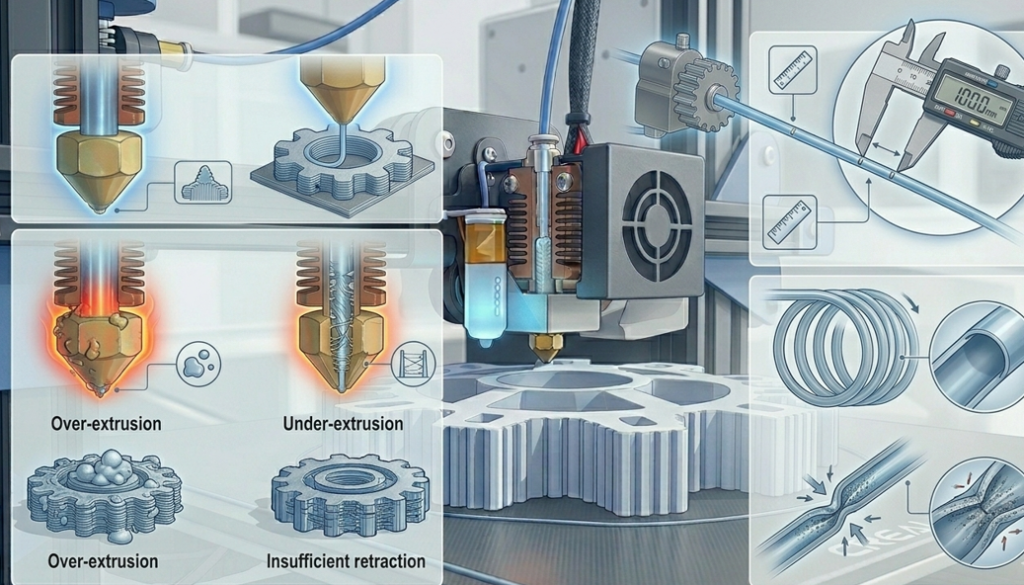
Over-extrusion is when the printer forces too much filament out of the nozzle. This could happen because of incorrect settings, faulty calibration, or even a clogged extruder. Over-extrusion often leads to:
- Blobs appearing around layer transitions
- Squished or thicker-than-expected layers
- Zits or uneven surfaces on prints
Z-Seam Issues
The Z-seam is the line where the extruder begins a new layer. If the slicer always starts the print at the same location, the filament buildup at this spot leads to visible defects, such as zits. In some cases, the seam is visible along the edges of the print, contributing to the artifacts.
Filament Moisture and Quality
Filament moisture is one of the less obvious causes of blobs, zits, and strings. Filament absorbs moisture from the air, and when this moisture is heated in the extruder, it turns into steam, causing bubbles in the filament that result in blobs and poor surface quality.
Moreover, lower-quality filaments often have inconsistent diameters, leading to issues with extrusion, creating surface defects.

How to Fix Strings, Zits, and Blobs in Creality Slicer?
Now that we understand why these artifacts appear, let’s walk through the fixes. We will cover Creality Slicer settings, as well as general troubleshooting tips that are effective across slicer software. For more detailed configuration guidance, visit our Creality Slicer Settings Guide at creality-slicer-settings to learn how to optimize slicer profiles, extrusion flow, and temperature controls.
Adjust Retraction Settings
As mentioned earlier, improper retraction is one of the biggest culprits of print artifacts. Let’s start with retraction adjustments.
Retraction Distance & Speed
Start by tweaking the retraction distance and retraction speed in your slicer settings.
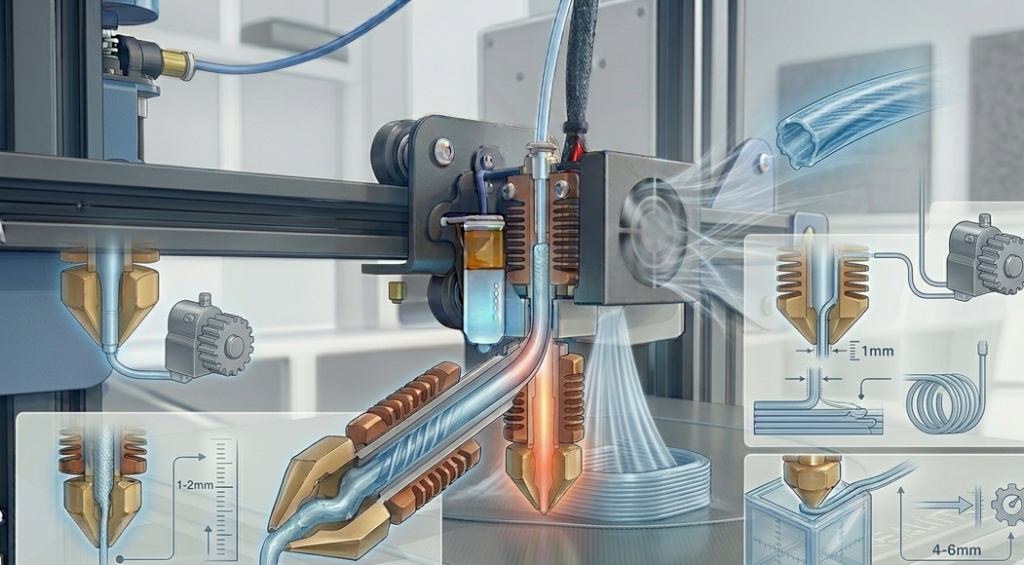
- Retraction distance: This controls how much filament is pulled back into the extruder before travel moves. A typical starting point is 1mm to 2mm for direct drive extruders, and 4mm to 6mm for Bowden extruders.
- Retraction speed: This controls how fast the filament is retracted. A speed between 20mm/s and 60mm/s should work well for most Creality printers.
How to Adjust in Creality Slicer:
- Open your print profile in Creality Slicer.
- Go to Filament Settings > Retraction.
- Set the Retraction Distance to 1.5mm for direct drive extruders or 4mm for Bowden setups.
- Set Retraction Speed between 40mm/s and 60mm/s.
- Run a test print and adjust as needed.
Small adjustments can lead to big improvements, so take it slow.

Optimize Temperature Settings
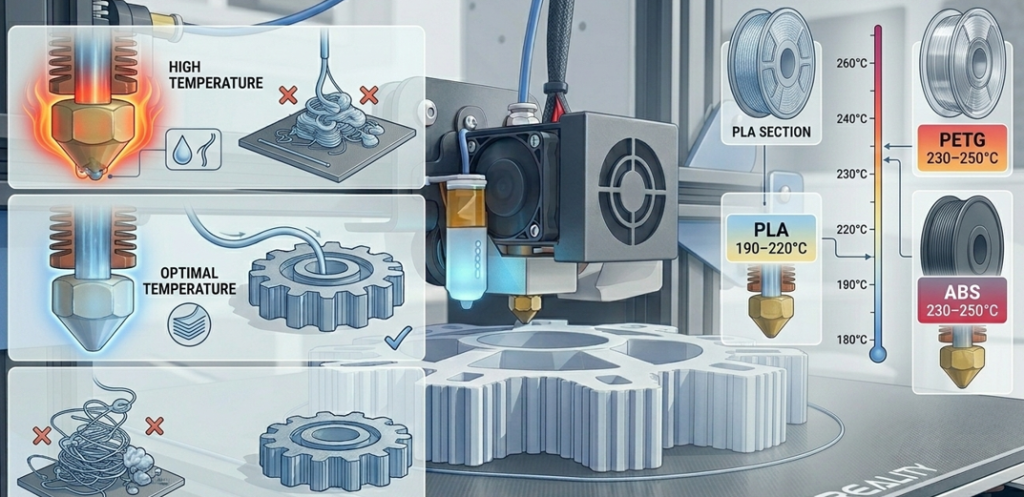
If your nozzle temperature is too high, it can cause the filament to stay too liquid, increasing oozing. On the other hand, if the temperature is too low, you might experience under-extrusion. For a complete breakdown of essential slicer controls like temperature, retraction, and extrusion that affect print quality, see Understanding Creality Slicer Settings at thecrealityslicer.com.
Recommended Temperature Ranges:
- PLA: 190–220°C
- PETG: 230–250°C
- ABS: 230–250°C
Try lowering the temperature in 5°C increments and see if you notice fewer strings or blobs.
How to Adjust in Creality Slicer:
- Go to Printer Settings > Temperature.
- Set the nozzle temperature based on filament type (i.e., PLA: 200°C).
- Print a test and lower temperature in increments if you experience stringing or blobs.
Calibrate Extrusion (Flow Rate)
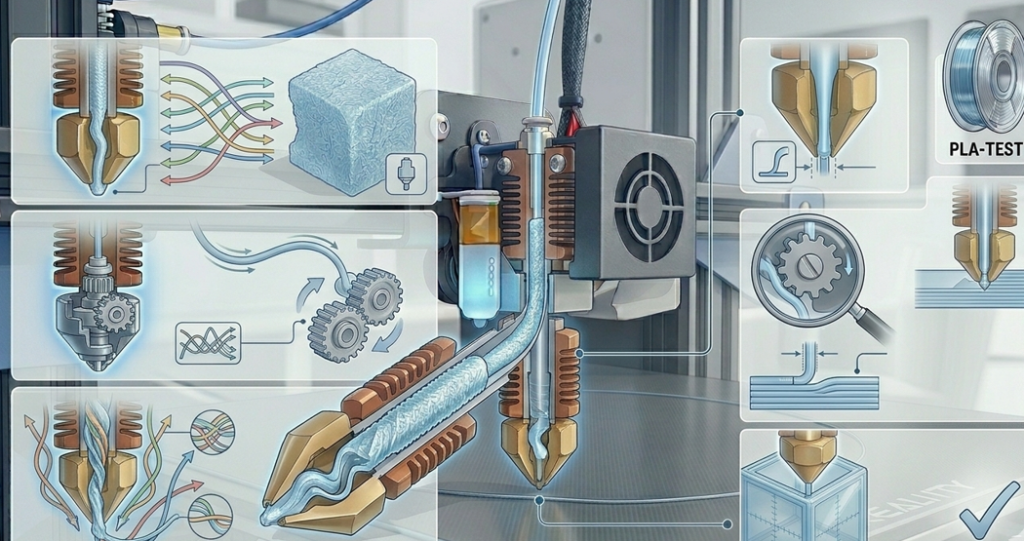
Improper extrusion can cause blobs and zits. It’s important to calibrate the extrusion multiplier or flow rate to match your filament.
How to Calibrate Extrusion in Creality Slicer:
- Print a single wall cube or calibration test model.
- Measure the printed walls with calipers.
- If the wall is too thick or thin, adjust the extrusion multiplier.
- In Creality Slicer, go to Filament Settings > Advanced > Extrusion Multiplier.
- Lower the extrusion multiplier if the walls are too thick or increase if too thin. Start at 1.0 for most filaments.

Adjust Z-Seam Settings
To reduce zits around the Z-seam, use Creality Slicer’s seam hiding options.
How to Adjust Z-Seam Settings in Creality Slicer:
- Open your print profile and go to Advanced Settings.
- Under Z-seam Alignment, set the option to Random (for reducing visible seams) or Back Corner to hide the seam in less visible parts of the print.
- Re-test with Z-seam set to Random and check for a smoother surface.
Cooling Adjustments
Proper cooling can prevent blobs from forming, especially when printing with filaments like PLA and PETG.
How to Adjust Cooling in Creality Slicer:
- In the Creality Slicer, go to Filament Settings > Cooling.
- Enable Enable Fan and set fan speed to 50% for the first few layers, and 100% for subsequent layers.
- Ensure that minimum layer time is set so each layer has adequate time to cool.
Use Coasting & Wiping Features
Some slicers offer coasting and wiping to help reduce oozing during travel.
How to Enable Coasting and Wiping:
- Open the Creality Slicer and go to Advanced Settings.
- Under Coasting, enable it with a small value (e.g., 0.2mm).
- Under Wiping, enable the nozzle to move slightly after extrusion to clean up any residual material.
Advanced Retraction Techniques for Optimal Results
While standard retraction settings often solve basic stringing issues, advanced retraction techniques can further enhance print quality. Here’s what to consider:
Dynamic Retraction Settings
Some slicers, including Creality Slicer, allow for dynamic retraction adjustments. By enabling this feature, the slicer adjusts the retraction settings on the fly based on factors such as print speed and nozzle temperature. This can significantly reduce stringing without compromising print speed.
How to Enable Dynamic Retraction in Creality Slicer:
- Open your slicer and go to Advanced Settings.
- Enable Dynamic Retraction under Retraction Settings.
- This will allow the slicer to automatically adjust retraction settings based on print conditions, optimizing retraction for each layer.
Retraction Priming (or Extra Prime Amount)
For printers that are prone to zits or blobs during travel moves, retraction priming can help. This involves pushing a small amount of filament into the nozzle after retracting it to ensure smooth extrusion when the nozzle starts again.
How to Enable Retraction Priming:
- Go to Filament Settings > Advanced.
- Locate the Extra Prime Amount setting.
- Set it to around 0.1mm to 0.2mm (test with small increments).
- This helps smooth out the start of extrusions after travel, preventing excess filament from building up.
Material-Specific Troubleshooting for Advanced Filaments
Troubleshooting PETG for Zits and Blobs
PETG is an excellent filament choice for strength and flexibility but is notorious for causing blobs and stringing issues, especially when cooling and retraction settings aren’t optimized.
- Key Fixes:
- Lower the extrusion multiplier to 0.95–1.0 to avoid over-extrusion.
- Increase cooling fan speed to 70–80% for better layer adhesion.
- Set retraction distance to 4mm–6mm for Bowden setups, 1mm–2mm for direct drive extruders.
- Print slower at 40mm/s to reduce oozing.
PETG Tips for Nozzle Clogs and Filament Oozing:
PETG is known for its sticky nature, which can cause nozzle clogs if not handled properly. Keep the nozzle clean, and avoid printing at temperatures above 240°C, as this increases the risk of excess filament buildup.
Troubleshooting ABS for Blobs and Warping
ABS is highly prone to blobbing and warping because of its high printing temperature and tendency to contract when cooling. To minimize these issues:
- Key Fixes:
- Ensure bed adhesion is good by using ABS slurry (a mixture of ABS and acetone) or a Kapton tape.
- Print at a consistent temperature (around 230–250°C) and use draft shields to prevent warping.
- Reduce travel speed to 70mm/s to reduce unwanted extrusion during nozzle movements.
ABS Tips for Layer Separation:
To combat layer separation and warping issues, make sure the heated bed is set to 100–110°C. Additionally, you might want to increase your first layer extrusion width by 120% to help with adhesion to the bed.
The Importance of Printer Calibration
Many intermediate users forget that even a small miscalibration can cause significant printing issues, including blobs, zits, and stringing. Here’re some calibration steps that you may have overlooked:
Calibrate Your Extruder
The extruder steps/mm calibration ensures that your printer is extruding the correct amount of filament. If it’s off by a small margin, you’ll experience over-extrusion or under-extrusion.
How to Calibrate Extruder Steps:
- Heat up your extruder to the filament’s optimal temperature.
- Measure 100mm of filament and mark it.
- Command your printer to extrude 100mm and measure how much actually gets extruded.
- Adjust the extruder steps in your firmware settings based on the difference.
Check for Bowden Tube Issues
If you’re using a Bowden extruder, make sure the Bowden tube is properly fitted and free of kinks or blockages. A twisted or pinched tube can cause filament jams, leading to inconsistent extrusion.
How to Check the Bowden Tube:
- Detach the filament and manually push it through the tube.
- Ensure it moves smoothly and doesn’t encounter resistance.
- Replace the tube if it’s worn out or obstructed.
Advanced Cooling Solutions: Optimizing for Clean Prints
Sometimes, cooling isn’t just about turning on the fans; it’s about how you control the airflow across different areas of your print.
Directional Cooling
To prevent issues like blobs, stringing, and warping, use directional cooling, which directs airflow to cool specific areas of the print as it’s being extruded.
- Use dual fans for PLA prints, and adjust their direction towards the outer layers.
- For materials like ABS, avoid cooling directly on the first few layers to prevent cracking.
How to Set Up Directional Cooling:
- Use an adjustable fan mount for your cooling fans.
- Set up the fans to focus airflow directly on the outer perimeter or overhangs, but avoid cooling the first layer.
Fine-Tuning Fan Speed and Layer Height
Sometimes, fan speed can be directly tied to layer issues. Slower fan speeds for first layers and higher speeds for subsequent layers help prevent warping and bubbling:
- First Layer Fan Speed: 20–30%
- Subsequent Layer Fan Speed: 50–100%
Final Tips for Prevention
After applying the above solutions, keep these tips in mind for future prints:
- Store filament in a dry box to prevent moisture absorption.
- Clean the extruder and nozzle regularly.
- Test with different filament brands if issues persist (sometimes lower-quality filament is inconsistent in diameter).
- Keep your printer’s firmware up to date to improve motion accuracy.
Conclusion
Fixing stringing, zits, and blobs is all about fine-tuning your printer’s settings and understanding the interplay between slicer parameters, filament properties, and printer hardware. With patience and methodical adjustments, you’ll be able to eliminate these pesky defects and create professional-quality prints.
How do I fix zits appearing only on one side of my print?
Zits on only one side of a print are typically caused by improper Z-seam alignment. Adjust your slicer settings to either randomize the Z-seam or move it to the back corner of the print. This will distribute the starting point of each layer more evenly, reducing visible defects.
Can the use of high-speed printing contribute to blobs and zits?
Yes, printing at high speeds can exacerbate issues like blobs and zits. When the printer extrudes filament too quickly, it can lead to over-extrusion, especially if the retraction and cooling settings aren’t adjusted. Slowing down the print speed can help reduce these artifacts significantly.
Why does my filament get stringy after printing several layers?
Stringing becomes more pronounced as the print progresses due to heat accumulation in the extruder. As the nozzle remains hot and extrudes continuously, filament can ooze out. To counter this, you can lower the temperature slightly for each subsequent layer and adjust the retraction settings to be more aggressive.
How do I know if my filament is absorbing moisture and causing print defects?
Filament that absorbs moisture tends to show signs of bubbling or excessive stringing during printing. To test, you can dry your filament by placing it in an oven or a filament dryer at around 50°C for a few hours. If print quality improves afterward, moisture was likely the culprit.
Does a clean nozzle really affect blob and zit formation?
Yes, a clogged or dirty nozzle can cause uneven extrusion, leading to blobs and zits on your print. Regularly clean the nozzle using a needle or a cold pull method to remove any filament buildup. This ensures consistent filament flow and prevents unwanted surface defects.

I share practical insights on the latest 3D-printing software and hardware, helping makers navigate tools and technologies with confidence. My goal is to make digital fabrication simple and accessible for everyone.
